Agent Configuration Overview
The Agent Command is the primary command that executes first and serves as a container for all other commands within the agent. It manages crucial aspects such as input parameters, success criteria, proxies and files.

Agent Configuration
The configuration screen for the Input Action command has two tabs viz. Options, and Text. Use the ‘Options’ tab to set the configuration for the agent. Use the Text tab to navigate to the text of the agent where the agent configuration text part is present.

Agent Properties
On the Options tab of the command, we have ten options:
Browser
Input Parameters
Proxies
User-Agents
Geolocation
Browser Profile
Success Criteria
Basic Authentication
Files
Runtime

Browser → General browser settings
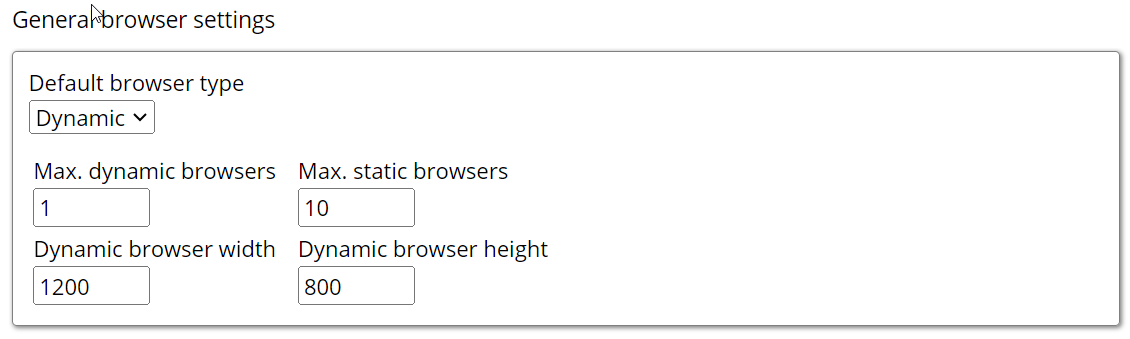
General Browser Settings
Default browser type: Specifies the type of a new web browser.
Dynamic: A fully interactive browser that seamlessly executes scripts and renders styles, providing the complete functionality you'd experience during regular web browsing. It first loads the web page into a browser, where the page is parsed, rendered, and any JavaScript is executed. This makes the execution time of agents slow in Dynamic as compared to Static. By default, this property is set to Dynamic.
Static: A lightweight browser that loads only specified file types, such as HTML or JSON, without executing JavaScript, resulting in faster performance. The HTML parser processes web pages without a web browser, completely ignoring JavaScript, which allows for much quicker execution than a standard browser. Similarly, the JSON parser efficiently handles only text-based content, making it ideal for retrieving data through HTTP APIs in JSON format. However, this approach may not function properly on websites reliant on JavaScript. In Sequentum Cloud Static mode, the system automatically selects the most appropriate browser for your agent to optimize performance.
Max. dynamic browsers: This property specifies the maximum number of active dynamic web browsers this agent uses to retrieve data when the property "Default browser type" is set to Dynamic. An active web browser refers to one that is currently loading a web page. The default value is set to 1.
Note: The best number for Max dynamic browsers depends on how hard you can hit the target website without making the website unstable and without getting blocked by the website. The number also depends on how much memory and how many CPU cores are available on the computer running the Sequentum Cloud.
A dynamic web browser uses a significant amount of memory and CPU and often uses many concurrent web connections to download content from a website, so the Max. dynamic browsers options should not be set too high. An HTML or JSON parser uses little memory and CPU, and only a single web connection, so the Max. static browsers option can often be set much higher.
Max. static browsers: This property defines the maximum number of concurrently active HTML or JSON parsers. An active parser refers to one currently in the process of loading a web page. By default, this value is set to 10.
Dynamic browser width: This property sets the width of all web browsers at runtime when using the Dynamic browser type. By default, the width is set to 800, but it can be adjusted as needed. This feature is only relevant when the Default browser type is set to Dynamic.
Dynamic browser height: This property sets the height of all web browsers at runtime when using the Dynamic browser type. By default, the height is set to 1200, but it can be adjusted as needed. This feature is only relevant when the Default browser type is set to Dynamic.
Browser → Block browser content

Load images by default: This property determines when images should be downloaded and displayed in the web browser. While an agent can still capture images without displaying them in the browser, proper screenshots require the images to be visible. Disabling image downloads improves the agent's performance. This option is applicable only when using the Default browser type as Dynamic. By default, this property is set to True/Checked.
Load styles by default: This property defines when style sheets are downloaded by the web browser. It also applies to the HTML static parser in design mode, allowing for precise control over when styles are loaded. This feature is particularly useful in dynamic browsing environments, optimizing content loading and performance. By default, this property is set to True/Checked.
Block known ad servers by default: This property prevents the web page from loading content from known ad servers( such as 'http://ad.doubleclick.net '), trackers, and social media widgets to improve speed, reduce noise, and avoid unnecessary data collection, which can slightly improve the page loading speed or speed up the Processing. By default, this property is set to True/Checked.
Block requests between actions by default: Prevents background network requests that aren't triggered by user actions, ensuring cleaner, more accurate scraping and reducing unwanted traffic. By default it is Unchecked.
Custom Javascript

Inject Custom Javascript: The Custom JavaScript will be injected into all pages loaded by a Dynamic Browser. By default it is Unchecked.
Browser → Advanced Browser Settings

Allow Canvas reading: The default setting is False/Unchecked, which prevents canvas reading at runtime. Setting this property to True enables canvas reading during runtime, helping to combat browser fingerprinting and prevent blocking. This feature is only applicable when using the Default browser type as Dynamic.
Load insecure content: The default value is False/Unchecked, which prevents loading or running insecure content at runtime. When set to True/Checked, it allows the loading and execution of insecure content during runtime. By default, an HTTPS page cannot run JavaScript, CSS, or plugins from HTTP URLs, but enabling this option overrides that restriction.
Load PDF documents: This property controls the loading of PDF URLs and the downloading of PDF documents in Sequentum Cloud. It also helps prevent blocking on certain websites. When set to True/Checked, it enables the PDF extension in the dynamic browser at runtime. By default, the property is set to False/Unchecked, meaning PDFs will not be loaded or downloaded unless explicitly enabled. By default, the property is set to False/Unchecked.
Load WebGL: When set to True/Checked, this property enables the loading of WebGL in dynamic web browsers at runtime. This feature is only applicable when using the Default browser type as Dynamic. By default, the property is set to False/Unchecked.
Load Flash: When set to True/Checked, this property allows Flash to load in dynamic web browsers at runtime. This feature is only applicable when using the Default browser type as Dynamic. By default, the property is set to False/Unchecked.
Load Gpu: Enables hardware acceleration by loading the system’s GPU during scraping. Useful for rendering complex or animated web pages that require graphical processing. By default it is Checked.
Load WebGpu: Activates support for WebGPU, a modern web graphics API, allowing pages that rely on it (e.g., for 3D rendering or advanced visual effects) to render correctly during scraping. By default it is Checked.
Input Parameters → Agent input parameters
Input parameters are named values that are assigned when an agent starts. Any data-consuming command within the agent can access and use these parameters.

Agent input parameters

New: Adds an input parameter which thereby becomes visible on the UI and whenever the user clicks on the New button, a new Input parameter is added. A user can add as many input parameters as they want.
Name: Define the name of the parameter, which is used to reference it within the agent. The user must input the parameter name in this field, and it will be reflected in any data-consuming commands within the agent.
Value: Assign the value for the parameter. This value can be adjusted externally during runtime configuration. The user is required to input the parameter value in this field, which the agent will use during execution.
Encrypt: Secures the parameter by encrypting the text entered in the Value box. Once encrypted, the content inside the Value box will be displayed in its encrypted form.
Delete: A delete icon is displayed in front of each input parameter added by the user, allowing the user to remove the parameter if it is no longer needed.
Adding Multiple Input Parameters :
A user can add multiple input parameters based on the agent's requirements, and these parameters can be used in any data-consuming command within the agent. The text entered in each Name textbox will be visible and accessible to every data-consuming command.

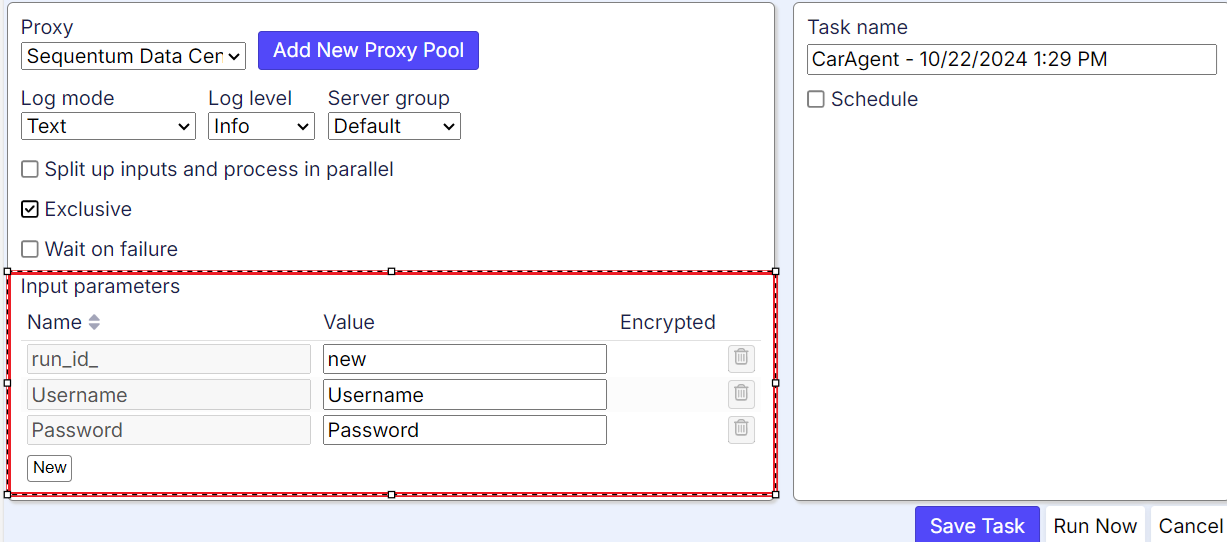
We can also modify Input Parameter values at runtime. These values can be adjusted or manipulated externally during the runtime configuration, as shown in the above screenshot.
Proxies → Proxy settings
A proxy (or proxy server) is an intermediary between a user's device and the internet, acting as a gateway that allows users to access websites or services indirectly by routing their requests through the proxy. The user's actual IP address is replaced by a proxy or a list of proxies, which can be rotated with each page load based on the user's requirements.

Proxy type
This setting allows you to configure the proxy. The default value is Proxy Pool.
Proxy pool: Proxies play a crucial role in web scraping operations to ensure anonymity and avoid website blocking. Sequentum Cloud allows for the configuration of proxy pools, which are collections of proxies purchased or rented from a provider. A proxy pool can combine multiple proxy provider pools into one large pool for efficient management. When this option is selected, two new textboxes - ”Proxy Rotation Interval” and “Proxy Pool” - along with a “New Proxy Pool”' button, will appear on the user interface as shown below :

Proxy rotation interval: This property specifies how frequently the proxy pool is rotated based on the number of page loads executed. The proxy will rotate with each new page load according to the count specified by the user, helping to prevent website blocking. The effectiveness of this property may vary depending on the website’s performance and how frequently it experiences blocking. By default, the count is set to 0 which means the proxies will not get rotated.

Proxy pool: In this textbox, the user can either manually enter the proxy pool name or select a desired proxy pool from the dropdown menu. The available options in the dropdown are those created by the user in the Sequentum Cloud Control Center, accessible via Organizations > Proxy Pools, as shown below


New Proxy Pool: If the user wants to add and create their own Proxy Pool, then this option comes into play. Clicking this option/button generates a new window with various options as listed below:

Back to proxies: This option navigates the user back to the previous page, which is the Proxy Settings.


Proxy pool name: The user must enter a desired name for the Proxy Pool, which will be displayed in the UI within the Proxy Pool List dropdown menu and will be used by the user at runtime.

Description: The user must provide any description, such as the country of the proxy pool being used or details about a specific agent for which the proxy pool is created.

Proxies: The user must enter a list of valid proxies, including the associated usernames and passwords.

Add Proxy Pool: This option is used to successfully create the proxy pool and the same will be reflected on the UI under the Proxy Pool List dropdown menu.


Cancel: This option cancels the process of creating a new proxy pool and returns the user to the previous page, i.e., Proxy Settings.

User-Agents > User agent pools
This property is used to configure the User Agent pool according to specific requirements. It consolidates all the User Agent-related settings, such as override and rotation configurations into a unified category. This enables end-users to customize and manage User Agents based on browser type and version. User Agent pools provide options like rotating User Agents on each page load, rotating with proxy addresses and shuffling the User Agent list during runtime. The available configuration options include:

User-Agent
This setting allows you to configure the User Agent as either "No Override" or “Chrome” or "Override with Pools". By default, the option is set to "No Override".
Override With Pools: A collection of user-agent pools. Each pool contains a list of user-agents. All enabled pools are combined and shuffled (if shuffle is enabled) at runtime (applicable only when overriding with pools). This option allows the agent to override the default User Agent with custom defined configurations, enabling it to mimic different browser environments. This feature is crucial in web scraping for avoiding detection and bypassing anti scraping mechanisms that track User Agent consistency.
When you choose "Override With Pools", you unlock customized User Agent settings for your agent. This lets you override the default User Agent and explore new options as described below:
Rotate User-Agent: Randomizes the User Agent with each request, reducing the risk of being blocked by websites that monitor repeated requests from the same User Agent. By default, this option is set to “No Rotation”.
No Rotation: Maintains a consistent User Agent throughout the session minimizing variation but also increasing the detection risk.
On Every Page Load: Changes the User Agent with every page load to introduce variability which helps avoid blocking by mimicking real users.
Associate With Proxy Address: Synchronizes User Agent rotation with proxy changes, ensuring anonymity by rotating both elements, a critical strategy to avoid IP-based blocking.
New On Proxy Rotation: The user agent rotates specifically with proxy rotation. Ensures both the User Agent as well as the proxy change simultaneously, further obscuring scraping patterns and minimizing detection.
These options provide fine control over User Agent behaviour enhancing the ability to scrape without triggering server-side blocking mechanisms.
User-Agent Pools(Type): This option allows you to select specific browser types (e.g., Chrome, Firefox) or device types (e.g., mobile, desktop) for the User Agent pool, enabling more targeted scraping that mimics real user environments.
Shuffle User-Agents: Randomizes the order of User Agents within the combined pool (applicable only when overriding with pools). to reduce detection risk. This feature adds an additional layer of variability by selecting User Agents randomly during runtime, helping to avoid server-side detection mechanisms that look for patterns in web scraping. By default, this option is enabled (Checked).
New User-Agent Pool: Build a unique pool of User Agents for your tasks.
With the help of this option, we can create a new User Agent pool either by manually providing the values or by using the option “Import from Csv”. By selecting this option, it will give rise to further multiple options which will help us in creating a new User Agent pool or list of pools. All the options with their descriptions are described below :

Add user agents: Users can create and add as many user agents as needed and also have the option to import a CSV file containing a list of User Agents. This flexibility allows for easy management and bulk additions of user agents, improving efficiency.
Example User Agent String: Mozilla/5.0 (Windows NT 10.0; Win64; x64) AppleWebKit/537.36 (KHTML, like Gecko) Chrome/119.0.6045.159 Safari/537.36Pool Type: This option is enabled by default and will create user agents as lists.
Description: Users can provide a description in this text box based on their needs. However, it is not a mandatory field and can be left blank, as it is optional. By default, the text box is empty, displaying "(Optional)" as a placeholder.
Import from Csv: This option allows users to import a CSV file containing multiple User Agent Strings, which will be added directly. Ensure that the column names are correctly formatted and the CSV file is properly structured for a smooth import process.


Save Pool: This option is used to create a pool once all fields are set by the user. After clicking "Save", the user will be redirected to the previous page i.e. "User Agent Pools" where the newly created pool will be visible in the UI.
Cancel: This option cancels the creation of a new user agent pool and redirects the user back to the "User Agent Pools" page.
New: This option allows users to manually add a row where they can enter a user agent string along with the associated values. Users can click the "New" button to add multiple rows, providing as many user agent strings as needed. By default, none of the rows are added to the UI.
Delete: This option allows users to remove a row containing a user agent string or a blank row that is no longer needed.
Back to User-Agent Pools: This option navigates the user back to the previous page, which is "User Agent Pools".
Enabled: This option allows the user to enable or disable the user agent pool based on their requirements.
Edit Pool: This option enables users to modify an existing User Agent Pool that was previously created. By clicking on this option, users will be redirected to the "Add User Agents" page, where the previously created pool will be displayed in the UI for editing.
Delete: This option allows users to remove a User Agent Pool that was previously created and is no longer needed.
No Override: Selecting this option will use the default chromium browser's User Agent throughout the entire session.
Chrome:

Geolocation → Geolocation pool
This property allows users to configure the Time Zone pool based on their specific requirements of the user. By default, the value is set to “No Override”.
Geolocation / Timezone
The Time Zone feature enables users to configure a different time zone other than the one set on their machine. Users can input a Timezone ID in the IANA format [e.g. 'America/Los_Angeles']. This feature offers two options: No Override and Override With Pool. Choosing Override With Pool grants agents access to predefined pools for setting time zone overrides based on user preferences. Opting for No Override retains the default system time zone. By default, the value is set to No Override.

No Override: Selecting this option will use the default system time zone.
Override With Pool: This option allows the agent to bypass default system Timezone settings by customizing pool configurations, which can help mitigate detection and blocking during web scraping. It unlocks advanced features like Rotate Geolocation, Shuffle Geolocation, and New Timezone ID enabling the agent to dynamically adjust its geolocation and Timezone, reducing the chances of being blocked by anti-scraping mechanisms that rely on identifying static user data.
Rotate Geolocation: Emulates different Timezone IDs. This setting can cause some websites to work incorrectly. The default value is set to “No Rotation”.
No Rotation: Indicates that the Timezone will not change.
On Every Page Load: Indicates that the Timezone will Rotate on every page load.
New On Proxy Rotation: Indicates that the Timezone will rotate with proxy rotation.
Shuffle Geolocations: This option shuffles the individual Timezone IDs and and will provide shuffled Timezone IDs to the agent at runtime instead of following a sequential order. By default, this option is Enabled.
Timezone Id: The Time Zone feature allows users to configure a time zone different from the one set on their machine. It accepts time zone IDs in the IANA format [e.g. 'America/Los_Angeles']. Two options are available under Timezone ID: New to add additional time zone input fields and Delete to remove them.
New: Adds a Timezone ID input field to the UI. Each time the user clicks the 'New' button, an additional Timezone ID input field appears. Users can enter valid Timezone IDs in IANA format and can add as many IDs as needed.
Delete: A delete icon is displayed in front of each Timezone Id added by the user, allowing the user to remove the Timezone Id if it is no longer needed.

Browser Profile → Browser profile settings
Browser profile settings refer to the configurable options that allow users to customize and manage their browsing experience within a web browser. These settings can include various parameters that affect how the browser functions, how it interacts with the websites and how it manages user data.
Rotate Browser Profile
An agent can be set up to randomly switch between different web browser profiles during data extraction. By default, the "Rotate Browser Profile" option is set to "No Rotation." There are four available options in the dropdown menu that users can choose from, each controlling how the agent handles browser profiles. If the user selects "No Fake Profile," all associated checkbox options will be disabled and ignored.

Generate canvas string : This property returns fake yet valid canvas strings, even when "Allow Canvas Reading" is disabled. Canvas reading in HTML5 is utilized by certain websites for browser fingerprinting. In Sequentum Cloud, this property consistently generates a valid random (spoofed) canvas string, helping to conceal your fingerprint signature and ensuring uniqueness for your canvas string on target websites. By default, this property is Disabled.
No Fake Profile: Choose this option to use the user's real browser profile without any anonymization or masking. When selecting this option from the dropdown, all related checkbox options will be disabled and ignored.
No Rotation: Indicates that the Web browser profile will not change.
On Every Page Load: Indicates that Web browser profile will Rotate on every page load.
New On Proxy Rotation: Indicates that Web browser profile will rotate only when the proxy gets rotated.
Webdriver: This setting defines the value of the browser's navigator.webdriver property, which indicates whether a web driver is in use or not. By default, the property is set to "False." Users can adjust this value by selecting one of three options from the dropdown menu: "True," "False," or "Undefined.
Undefined: Selecting "Undefined" deletes the navigator.webdriver property, making it return as undefined.
True: Selecting "True" sets the navigator.webdriver property to return true.
False: Selecting "False" sets the navigator.webdriver property to return false.
Generate canvas string : This property returns fake yet valid canvas strings, even when "Allow Canvas Reading" is disabled. Canvas reading in HTML5 is utilized by certain websites for browser fingerprinting. In Sequentum Cloud, this property consistently generates a valid random (spoofed) canvas string, helping to conceal your fingerprint signature and ensuring uniqueness for your canvas string on target websites. By default, this property is enabled.
Generate audio context : This property returns a fake audio fingerprint context filled with random noise. By default, this property is disabled.
Generate connection info : This property returns false information regarding the internet connection. By default, this property is disabled.
Generate cpu info : This property returns false information about the CPU and memory. By default, this property is disabled.
Generate fonts: This property returns false information about the installed fonts. By default, this property is disabled.
Generate language : This property returns false information regarding the language. By default, this property is disabled.
Generate media devices : This property returns false information about media devices. By default, this property is disabled.
Generate performance timers : This property returns false timings from performance timers. By default, this property is disabled.
Generate plugins : This property returns false information about installed plugins. By default, this property is disabled.
Generate browsing history : This property returns a random browser history length and overrides the actual browser history length. By default, this property is Disabled.
Generate media codecs support : This setting enables the browser to simulate support for certain media codecs, allowing it to bypass checks from websites that require specific audio or video formats. It helps avoid blocking during testing or automation. By default, this setting is Disabled.
Generate webshare api: This property mocks Chrome's Web Share API, allowing Sequentum Cloud to imitate the functionalities it provides. Specifically, it can mock two main functions:
navigator.share: This method allows web pages to trigger the native sharing capabilities of the user's device.
navigator.canShare: This method checks if data can be shared using the Web Share API.
By default, this property is Disabled.
Generate chrome.app api : This property mocks the Chrome App API, allowing Sequentum Cloud to replicate the functions and responses of the Chrome App API. This API is typically utilized in Chrome extensions and apps to interact with browser-level functionalities and settings. By default, this property is disabled.
Generate chrome.runtime api : This property mocks the Chrome Runtime API, allowing Sequentum Cloud to mimic the functions and responses of the chrome.runtime API. This API is typically used in Chrome extensions and apps to interact with the Chrome browser environment, manage the extension lifecycle, and facilitate communication between components. By default, this property is disabled.
Mask tostring prototype: Some bot-detection scripts verify browser APIs by inspecting overridden functions/properties using the toString() method. Enabling this option masks the overrides and returns the expected native toString() output, helping prevent detection. By default, this property is enabled.
Generate User Agent Data:
When disabled, specific fields may remain empty. When enabled, these fields are populated with user-agent metadata. This setting controls whether browser user-agent parameters are transmitted to the target site. Useful for managing client-hint exposure.
Success Criteria > Success criteria
Allows users to define the conditions under which an agent run is considered successful. This includes setting specific values for minimum page loads, data count, export count, and maximum errors. These conditions help ensure that the agent performs as expected. Each option can be configured in provided text boxes, which are by default as empty with No Check written as a placeholder in each one.
To access the Success Criteria window, navigate to the Agent command and select Success Criteria in the Sequentum Cloud Editor.
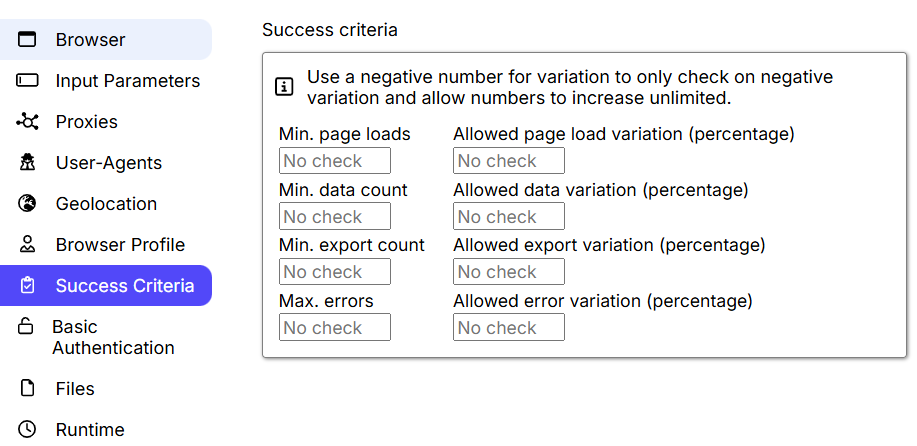
The following four success criteria can be defined:
Min. page loads: The minimum number of pages the agent must load.
Min. data count: The minimum number of data entries the agent must extract. Data entry is defined by setting the option to Increase data count on any command. The data count is increased every time a command with Increase data count is executed.
Min. export count: It defines the minimum number of rows exported to a file. A minimum number should be specified here so that it can prevent exporting blank files.
Max. errors: The maximum number of page errors allowed.
Success criteria can be specified as absolute numbers or as a percentage of the value from the last successful agent run. For example, if Min. data count is set to 80% it means the agent must extract a minimum 80% of the data count from the last successful run. A Percentage criteria always succeeds if the agent has not been successfully run before.
Allowed variation
Use these fields to define the minimum and maximum allowed variation as a percentage of the previous run's values.
Allowed page load variation (percentage): If you set the Allowed Page Load Variation to 90%, the agent run will be considered successful if it loads at least 90% as many pages as the previous successful run.
Allowed data variation (percentage): If you set the Data Variation to 90%, the agent run will be considered successful if it extracts at least 90% as much data as the previous successful run.
Allowed export variation (percentage): If you set the Export Variation to 90%, the agent run will be considered successful if it exports at least 90% as many items as the previous successful run.
Allowed error variation (percentage): If you set the Error Variation to 10%, the agent run will be considered successful if the error count is less than 10% of the errors encountered in the previous successful run.
Basic Authentication > Basic website authentication
Some websites use Basic Authentication, which prompts a login box for the user. Sequentum Cloud allows you to set the Username and Password for Basic Authentication. However, please note that this feature is only supported when the agent is configured to use the Dynamic Browser. This feature does not work in Static Browser mode.
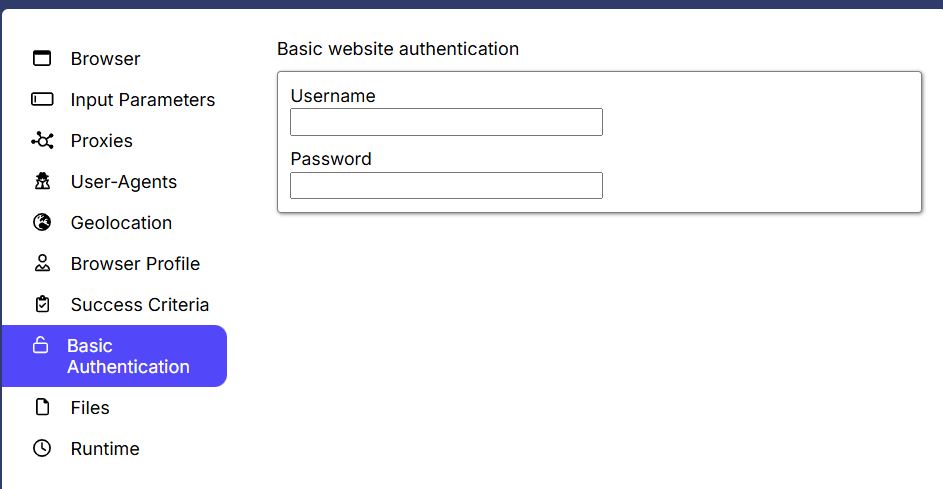
Username: In this text box, users can enter the desired username if the website requires login credentials for authentication.
Password: In this text box, users can enter the corresponding password if the website requires login credentials for authentication.
Files > Upload files
This feature allows users to upload files, making them accessible across all commands and scripts within the agent. Users can add multiple files simultaneously by either dragging and dropping them into the designated area labelled 'Drag files here...' or by selecting the Upload File option.
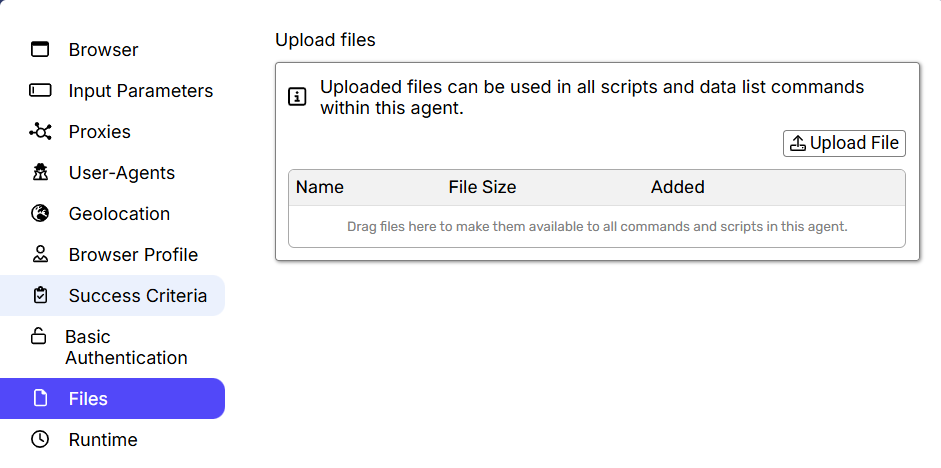
Drag and Drop Files: Users can add multiple files simultaneously by dragging and dropping them, ensuring they are successfully uploaded, accessible and visible in the user interface.
Upload File: Users can add multiple files simultaneously by clicking the Upload File option, ensuring they are successfully uploaded, accessible and visible in the user interface.
Name: Clicking on the file name link navigates to a detailed view displaying the File Size, Last Modified date, and an Edit option. From this screen, users can also edit the file directly.
Back to Files: This option navigates the user back to the previous page which is “Upload files”.
Edit: This option allows the user to modify/edit the uploaded file by clicking on it.
Save button: This option saves the updated file after the user has made changes.
Cancel: This option discards the changes made by the user, keeping the file in its original state without any modifications.
File Size: This column displays the actual size of the file uploaded by the user.
Added: This column shows the date and time when the file was uploaded by the user.
Delete: This option allows the user to remove the uploaded file.
Edit: This option enables the user to modify the uploaded file by clicking on it. Selecting the Edit option will navigate the user to a detailed view that displays the File Size, Last Modified date, and an additional Edit option. From this screen, users can directly edit the file.
Back to Files: This option navigates the user back to the previous page which is “Upload files”.
Edit: This option allows the user to modify/edit the uploaded file by clicking on it.
Save button: This option saves the updated file after the user has made changes.
Cancel: This option discards the changes made by the user, keeping the file in its original state without any modifications.
Download: This option allows the user to download the uploaded file.
Runtime Data > Runtime data retention
This feature allows runtime data to be retained, ensuring that it remains available when stopping an agent, enabling the run to be continued later. If this option is set to "Never," the user will not be able to retry the agent since no runtime data will be available. By default, this option is set to "When Errors Exist”.
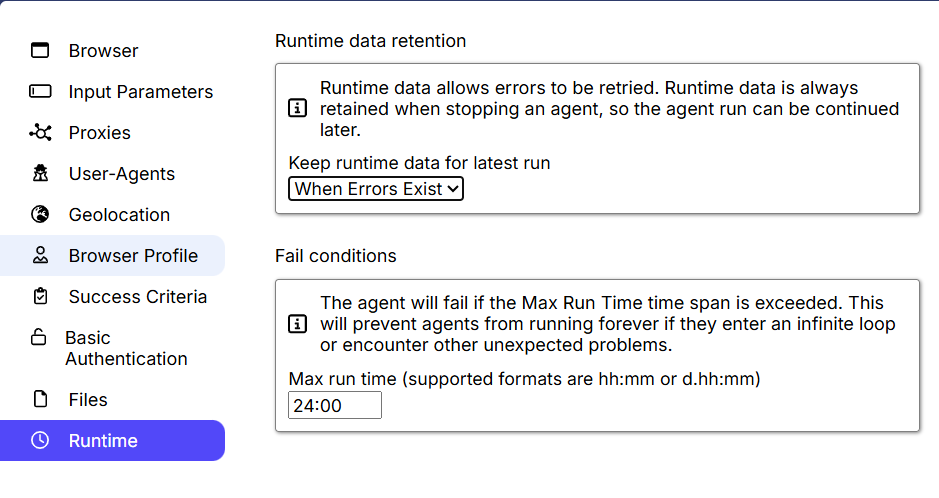
Always: Selecting this option ensures that the runtime data will be retained always, regardless of whether the agent succeeds or fails. This means the data will always be available for the user if they wish to utilize the retry functionality in the agent.
Never: Selecting this option ensures that runtime data will never be retained and will not be available for the user during retries or any other operations. As a result, the user will not be able to utilize the retry functionality when this option is set in the Runtime Data Retention.
When Errors Exist: Selecting this option ensures that runtime data will be retained only if an error occurs in the agent, As a result, the user will be able to utilize the retry functionality when this option is set in the Runtime Data Retention.
Fail Conditions
Max. run time: The agent will stop and get Failed if it doesn’t get completed before the provided time span. The specified value must be in format HH:mm:ss. The default value is set to 24:00.