Script Command
The Script command in Sequentum Cloud is a powerful command that allows users to execute custom scripts using Regex, JavaScript, C# and Python within their data extraction workflows. This command is particularly useful for extending functionality, transforming extracted data, handling complex logic, and automating custom tasks that go beyond standard point-and-click configurations. By leveraging the Script command, users can dynamically manipulate data, implement conditional logic, interact with APIs, and streamline automation processes efficiently.
When executed, the Script command runs the embedded code within the context of the Sequentum Cloud environment, enabling seamless integration with existing agents.
The Script command is located under the Other option in the command palette (refer attached snapshot)

In order to make the optimum use of the Script command, we can configure the options as shown in below screenshot, as per user requirement.
Command Configuration
The configuration screen for the Script command has three tabs. Browser, Options, and Text. Use the ‘Browser’ tab to select command XPath and apply selection transformations. Use the ‘Options’ tab to set the command name and other command properties. Use the ‘Text’ tab to navigate to the text of the agent where the command part is present.
Command Properties
On the ‘Options’ tab of the command we have four options:
General Settings
Selection
Script
Files
General Settings
In General Settings we have one section:
General Command Settings
General Settings → General Command Settings
The ‘General command settings’ section is designed for user customization to give the command a desired name, comment to describe in brief about the usability or requirement for the command and the disabled option to not execute this command at all.
Command name: This property specifies the name of the command.
Comments: Provides a field for entering metadata or a brief description regarding the command. These annotations are used internally to provide context for developers or team members. Comments are not part of the exported data and are only used for documentation purposes within the configuration.
Disabled: This checkbox allows the user to disable the command. When checked, the command is ignored during execution. By default, it is unchecked.
2. Selection
In Selection we have one section:
Selected content
Selection → Selected content
This section determines the content selected can be used in the script.
Script > Selection > Selected content
When missing: This dropdown states whether to ‘Fail’, ‘Warn’, ‘Ignore’ or ‘Passthrough’ when the selection does not exist.
When hidden or disabled: This dropdown states what to do in case the selection is hidden or disabled from the page.
Selected content: It displays the selected content from the XPath.
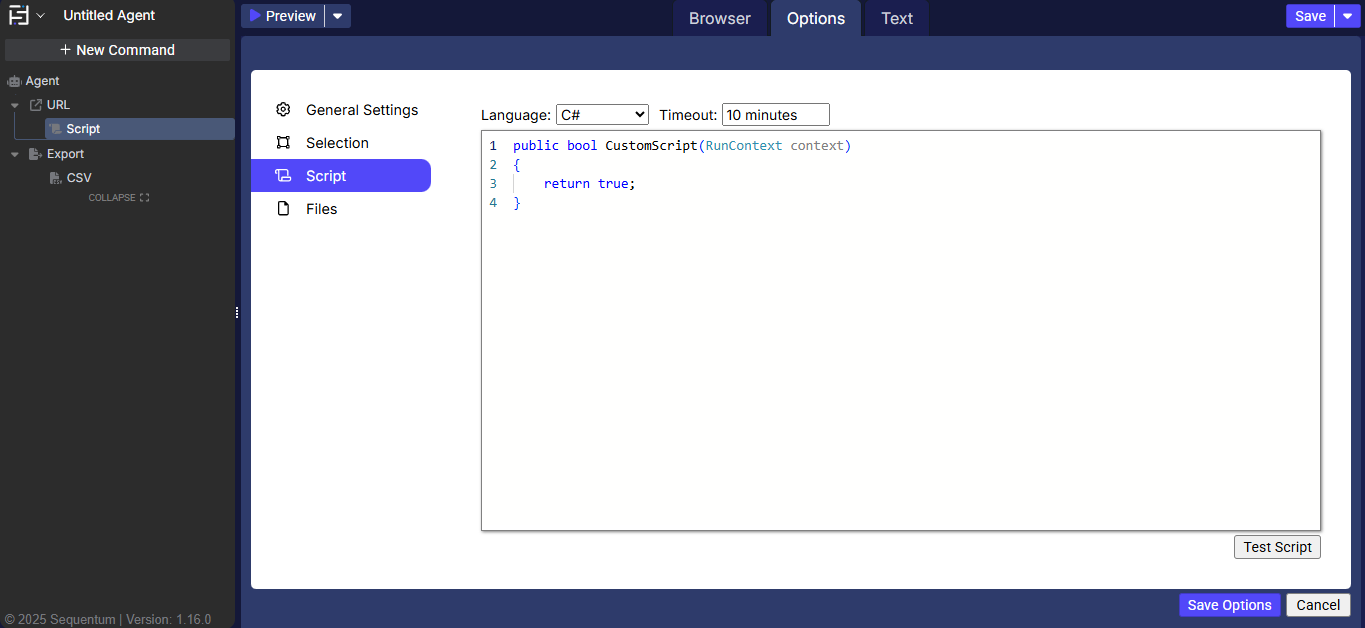
3. Script
This is the main tab in which all the scripting part is added. Select the preferred language from the dropdown and write the desired code to accomplish the task.
The timeout represents the duration for which the script is expected to complete.
For example, the following script delivers the extracted data via email to the recipients added in the agent Input Parameters.
#r System.Data.Common.dll
#r System.Data.dll
#r System.Net.dll
#r System.Net.Mail.dll
#r System.ComponentModel.TypeConverter.dll
#r System.Net.Primitives.dll
#r System.Runtime.InteropServices.dll

using System;
using System.IO;
using System.Data;
using System.Text;
using System.Net;
using System.Net.Mail;
using System.Collections.Generic;

public static bool ExportScript(ExportContext context)
{
    try
    {
        context.Log("Executing Email script");
        var data_files = context.ExportFiles.GetDataFiles();

        if (data_files.Count == 0)
        {
            context.Log("No data files found.");
            return false;
        }

        var filename = data_files[0];
        var EXPORT_DIR = Path.GetDirectoryName(filename);

        if (!File.Exists(filename))
        {
            context.Log("File does not exist: " + filename);
            return false;
        }

        if (new FileInfo(filename).Length == 0)
        {
            context.Log("File is empty: " + filename);
            return false;
        }

        context.Log("File is not empty");
        var emailBody = generateEmailBody(context, filename);

        if (string.IsNullOrEmpty(emailBody))
        {
            context.Log("Email body is empty, skipping email.");
            return false;
        }
        var dtemail = DateTime.UtcNow.ToString("MM-dd-yyyy");
        string subject = "Sequentum Cloud - Woodline Scraper: Progressive for date, " + dtemail;
        sent_email(context, subject, emailBody);
    }
    catch (Exception ex)
    {
        context.Log("Error in ExportScript: " + ex.Message);
        return false;
    }
    return true;
}

public static void sent_email(ExportContext context, string emailSubject, string emailBody)
{
    try
    {
        if (!string.IsNullOrEmpty(emailBody))
        {
            var toAddress = context.GlobalData["DistributionList"] as string;


            if (string.IsNullOrEmpty(toAddress))
            {
                context.Log("No recipient address found in DistributionList.");
                return;
            }

            context.Log("Sending email to: " + toAddress);

            // Send the email with the required parameters
            context.ScriptUtilities.SendEmail(
                toAddress,
                subject: emailSubject,
                body: emailBody,
                true,  // Ensuring the body is treated as HTML
                null,    // Optional: Can be null or set a specific sender address
                null,      // Optional: CC address
                null,     // Optional: BCC address
                attachments: null, // Optional: No attachments for now
                false,  // Optional: No read receipt required
                false // Optional: Normal priority
            );

            context.Log("Email sent successfully!");
        }
        else
        {
            context.Log("Email body is empty, not sending email.");
        }
    }
    catch (Exception ex)
    {
        context.Log("Error sending email: " + ex.Message);
    }
}

public static string generateEmailBody(ExportContext context, string csvPath)
{
    StringBuilder textBody = new StringBuilder();
    List<string> emailMessageList = new List<string>();
    try
    {
        var csv_read_all = context.ScriptUtilities.LoadCsvFileIntoDataTable(csvPath);

        if (csv_read_all.Rows.Count > 0)
        {
            textBody.Append("<table border='1' cellpadding='0' cellspacing='0' width='1300'>");
            textBody.Append("<tr bgcolor='#4da6ff'>");
            context.Log("Reached checkpoint 1.");
            // Create table headers
            foreach (DataColumn column in csv_read_all.Columns)
            {
                context.Log("Entered foreach to read columns!");
                textBody.Append("<td><b>" + column.ColumnName + "</b></td>");
            }
            textBody.Append("</tr>");

            // Create table rows
            foreach (System.Data.DataRow row in csv_read_all.Rows)
            {
                context.Log("Reached foreach to read records!");
                textBody.Append("<tr>");
                foreach (var item in row.ItemArray)
                {
                    context.Log("Reached foreach to read values!"+item.ToString());
                    textBody.Append("<td>" + item.ToString() + "</td>");
                }
                textBody.Append("</tr>");
            }
            textBody.Append("</table>");
        }
        else
        {
            context.Log("No rows found in CSV file.");
        }
    }
    catch (Exception ex)
    {
        context.Log("Error generating email body: " + ex.Message);
    }

    return textBody.ToString();
    context.Log("textBody: "+textBody.ToString());
}
4. Files
This feature allows users to upload files, making them accessible across all commands and scripts within the agent. Users can add multiple files simultaneously by either dragging and dropping them into the designated area labelled 'Drag files here...' or by selecting the Upload File option.
Drag and Drop Files: Users can add multiple files simultaneously by dragging and dropping them, ensuring they are successfully uploaded, accessible and visible in the user interface.
Upload File: Users can add multiple files simultaneously by clicking the Upload File option, ensuring they are successfully uploaded, accessible and visible in the user interface.
Name: Clicking on the file name link navigates to a detailed view displaying the File Size, Last Modified date, and an Edit option. From this screen, users can also edit the file directly.
Back to Files: This option navigates the user back to the previous page which is “Upload files”.
Edit: This option allows the user to modify/edit the uploaded file by clicking on it.
Save button: This option saves the updated file after the user has made changes.
Cancel: This option discards the changes made by the user, keeping the file in its original state without any modifications.
File Size: This column displays the actual size of the file uploaded by the user.
Added: This column shows the date and time when the file was uploaded by the user.
Delete: This option allows the user to remove the uploaded file.
Edit: This option enables the user to modify the uploaded file by clicking on it. Selecting the Edit option will navigate the user to a detailed view that displays the File Size, Last Modified date, and an additional Edit option. From this screen, users can directly edit the file.
Back to Files: This option navigates the user back to the previous page which is “Upload files”.
Edit: This option allows the user to modify/edit the uploaded file by clicking on it.
Save button: This option saves the updated file after the user has made changes.
Cancel: This option discards the changes made by the user, keeping the file in its original state without any modifications.
Download: This option allows the user to download the uploaded file.