
Overview
Agent Approval is an organization-level control that requires an agent to be reviewed and approved by an org admin — or by a user in a group with Approve access — before that agent can not be scheduled or run via API.
Approval is tracked per agent and shown as a status badge next to the agent’s name: Not Approved, Pending Approval, or Approved. All of the controls for submitting, approving, and disapproving an agent live on a new Approval tab on the agent page.
Note: Manually running an agent from the UI (the Run button) is not blocked by this setting. Only Schedule and run via API are gated behind approval.
Enabling Agent Approval for your organisation
Agent Approval is off by default and is turned on per organisation.
-
Go to Manage → Organization → Agent Approval.
-
Toggle Require agent approval on.
-
Confirm the change in the dialogue by clicking Enable Agent Approval.
-
Click Save.
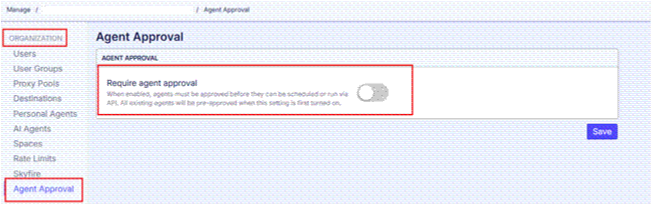
Agent Approval, off — the default state for an organisation.
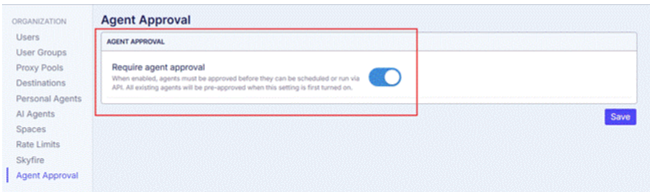
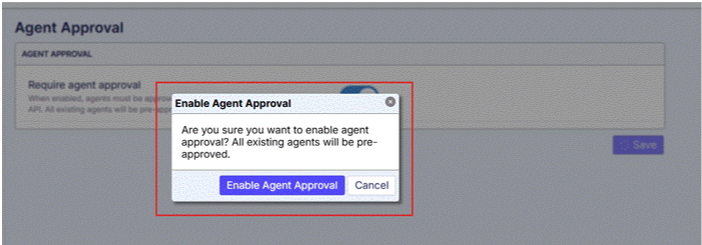
Note: All existing agents in the organisation are automatically pre-approved the moment this setting is turned on. Only agents created (or updated, depending on the re-approval setting) after that point start out as Not Approved.
The Approval tab
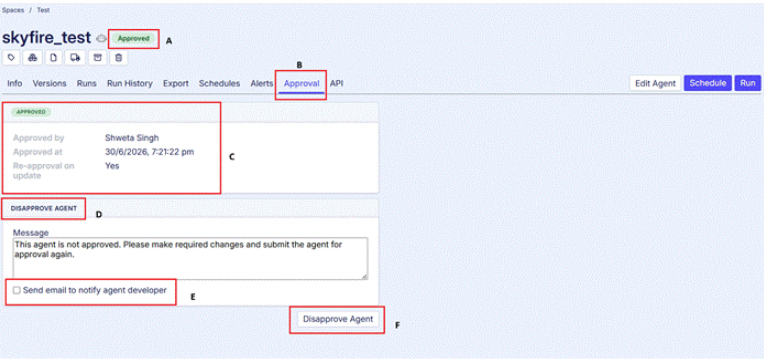
Every agent that is subject to approval has an Approval tab alongside Info, Versions, Runs, Schedules, and the rest. The screenshot below is annotated to show where everything lives:
-
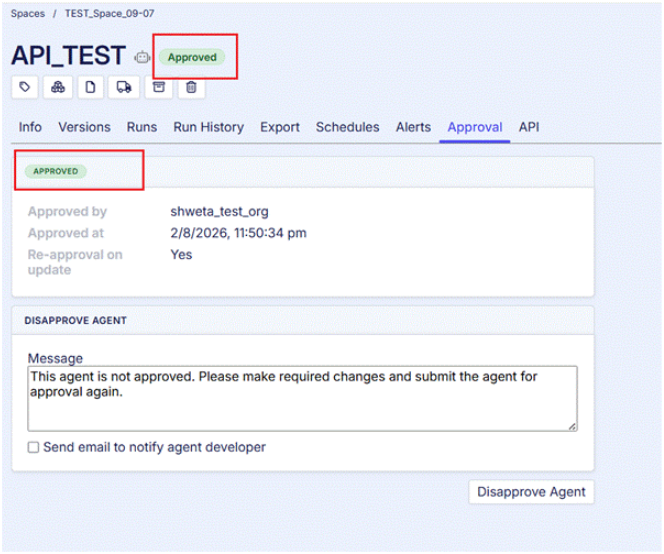
A — Status badge: shows the agent’s current approval state (Approved, Not Approved, or Pending Approval) next to its name, visible from every tab.
-
B — Approval tab: where all approval actions for this agent live.
-
C — Approval details: who approved the agent, when, and whether it will need re-approval after future updates.
-
D — Disapprove Agent panel: appears once an agent is approved, so it can be revoked.
-
E — Notify checkbox: optionally emails the agent’s developer that it was disapproved.
-
F — Disapprove Agent button: opens a confirmation dialog before the change is applied.
What changes for a new agent
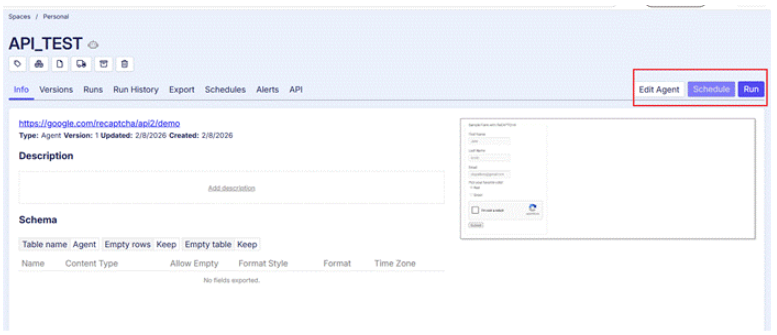
Once Agent Approval is enabled, any newly created agent starts out Not Approved. On the agent page, the Schedule button is greyed out and cannot be used until the agent is approved — the same restriction applies to running the agent via API.

Submitting an agent for approval
-
Open the agent and go to its Approval tab.
-
Under Submit for Approval, adjust the Message if you want to add context for the approver (it defaults to “Please review and approve this agent for production use.”).
-
Optionally check Send email to notify a specific approver and pick an Approver from the dropdown.
-
Click Submit for Approval.
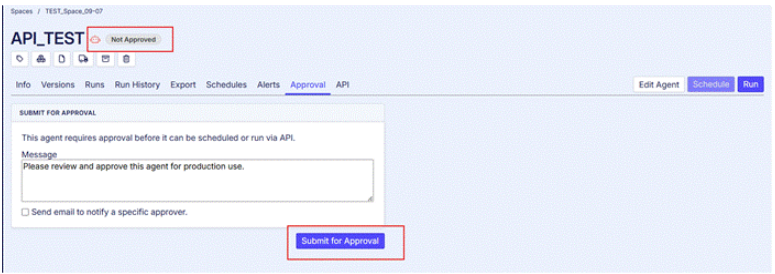
Submitting an agent for approval, with no specific approver selected.
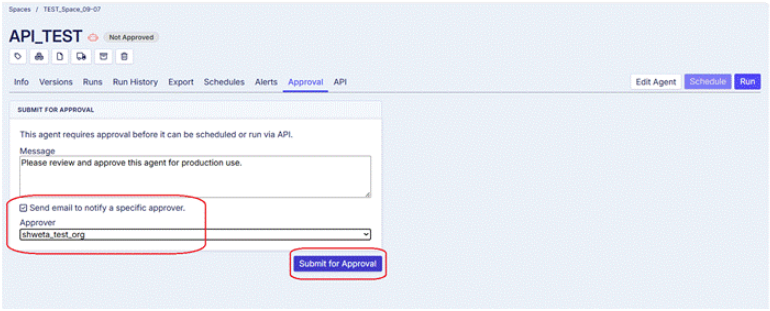
Note: Selecting a specific approver only decides who gets notified by email — it does not restrict who is allowed to act on the request. Any org admin, or any user in a group with Approve access, can approve or disapprove the agent, whether or not they were the one selected.
Once submitted, the agent’s badge changes from Not Approved to Pending Approval, and the request appears for approvers both on the agent itself and on the organization-wide Pending Approvals page.
Approving an agent
An approver can act on a request in either of two places.
From the agent’s Approval tab
-
Open the agent while it is Pending Approval and go to its Approval tab.
-
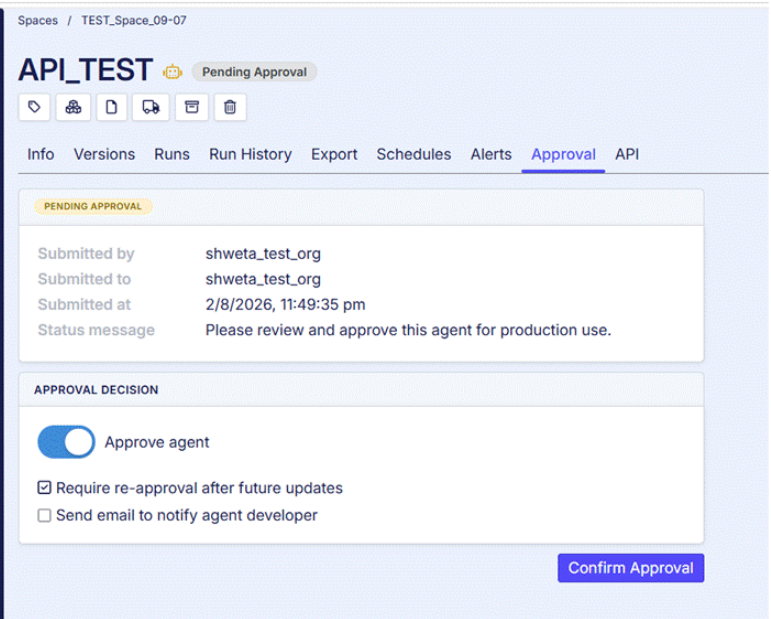
Under Approval Decision, leave Approve agent toggled on.
-
Leave the Require re-approval after future updates checkbox checked if the agent needs to be approved again after it is next edited, or leave it unchecked otherwise.
-
Optionally check Send email to notify agent developer.
-
Click Confirm Approval.
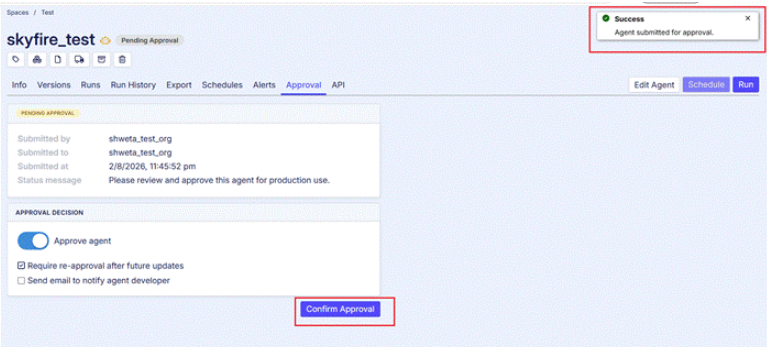
Approving a request directly from the agent’s Approval tab.
From the organization’s Pending Approvals page
Manage → Organization → Pending Approvals lists every agent across the organization that is currently awaiting approval, with the requesting space, who requested it, when, and the submitted message.
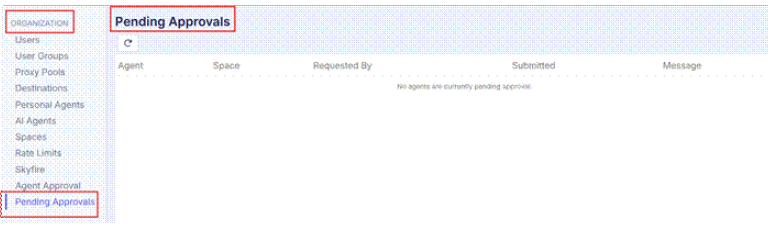
-
Go to Manage → Organization → Pending Approvals.
-
Find the agent and click Approve on its row.
-
Fill in the Approval Decision panel that expands below the list and click Confirm Approval.
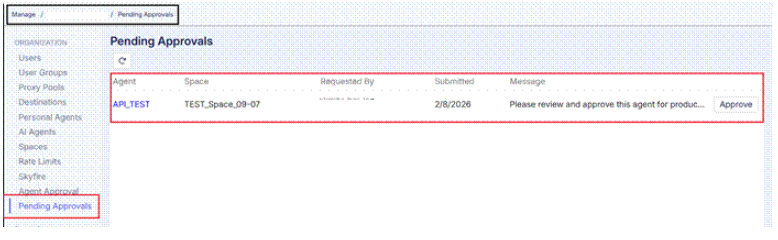
An agent (API_TEST) awaiting approval, listed for the org admin.
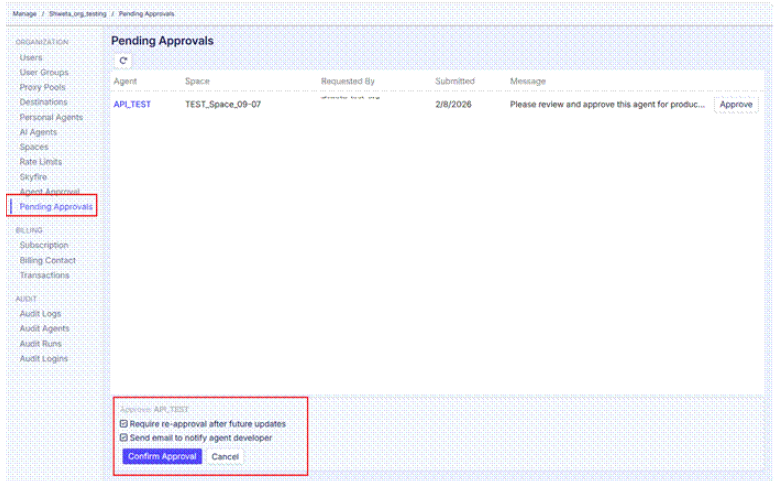

Once approved, the agent’s badge changes to Approved, its Approval tab shows who approved it and when, and it can immediately be scheduled or run via API.
Disapproving an agent
Approval can be revoked from an already-approved agent at any time, whether or not it currently has active schedules.
-
Open the approved agent and go to its Approval tab.
-
In the Disapprove Agent panel, edit the Message if needed (it defaults to a note asking the developer to make changes and resubmit).
-
Optionally check Send email to notify agent developer and choose the developer from the dropdown.
-
Click Disapprove Agent.
-
Confirm the action in the dialogue.
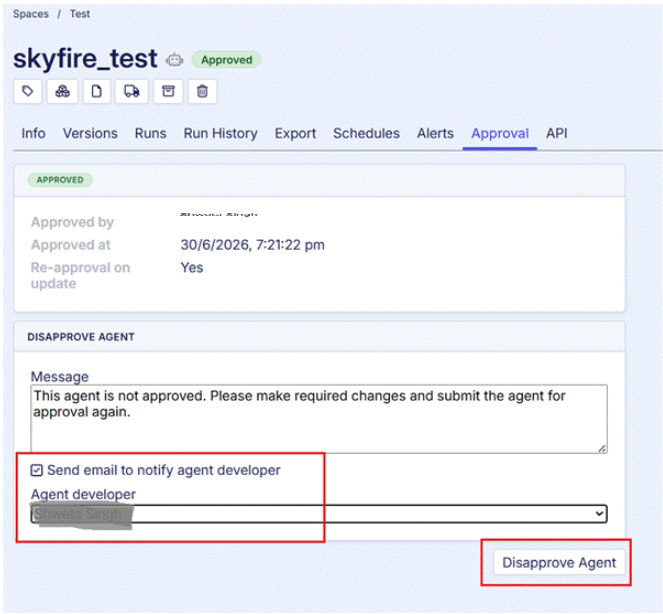
Disapproving an agent, with the developer notification enabled. 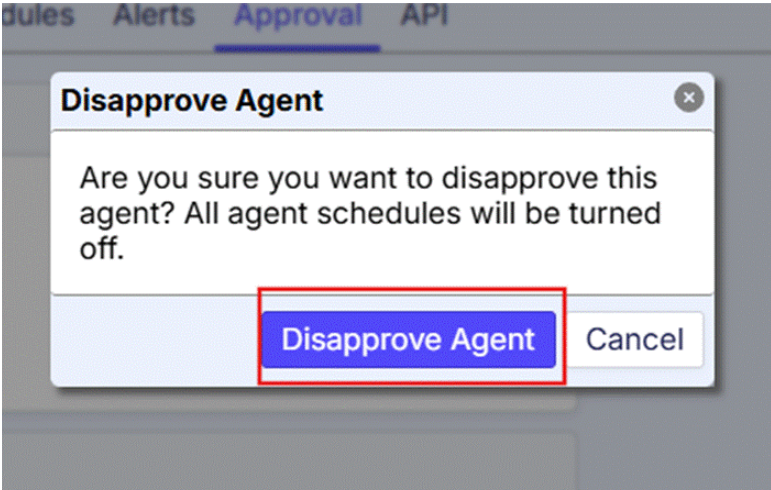
Confirmation dialog shown before an agent is disapproved. Note: Disapproving an agent immediately turns off all of its schedules. It also blocks it from running via API again until it is resubmitted and re-approved.
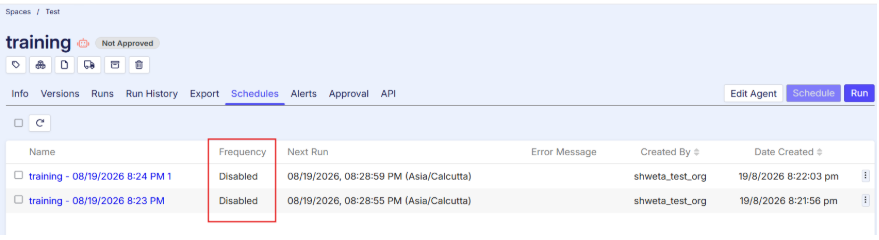
The agent’s badge changes back to Not Approved, and the Submit for Approval panel reappears so it can be sent back for review once changes are made.
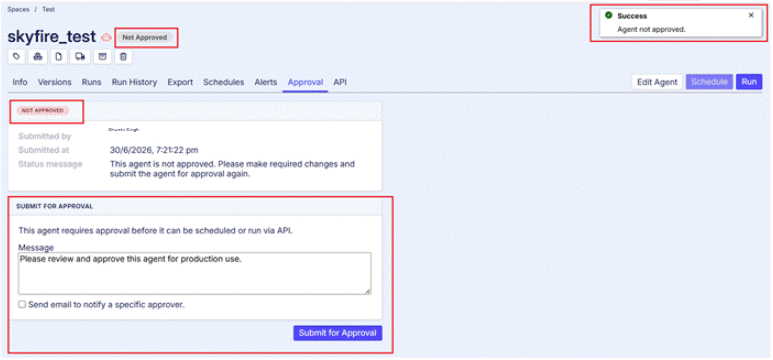
Granting approval access to a user group
Approving and disapproving agents is not limited to org admins. Approval is one of the access levels that can be granted to a user group on a per-space basis, alongside Full, Read, Write, Delete, Run, and Schedule.
-
Go to the space and open Edit Space.
-
Under User Group Access, add the user group (or locate it if it’s already listed).
-
Check Approve for that group.
-
Click Save Space.
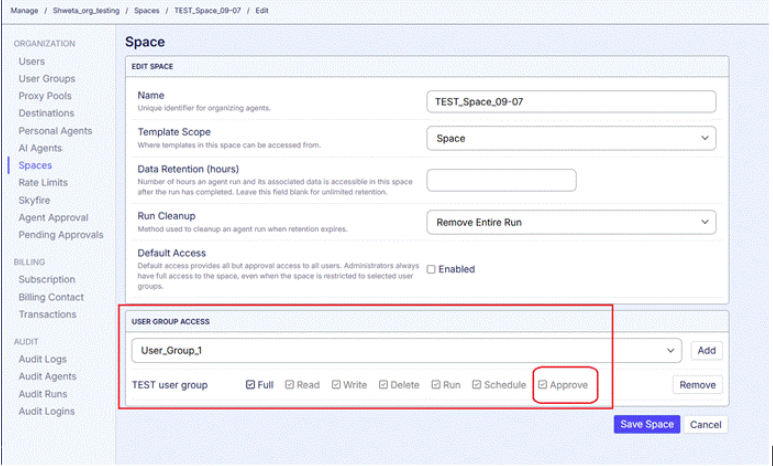
Granting a user group Approve access on a space, alongside its other permissions.
Note: Default Access grants every user in the organization all permissions on a space except Approve. To let a group of users approve or disapprove agents in a space, it must be added under User Group Access with Approve (or Full) checked explicitly.